This is a guide on installing openSUSE 11.4 from a single DVD. This is a basic overview of the installation steps for most users. For more information, please refer to the Installation page on how to install openSUSE on specific platforms, and to the Installation help page for more information.
Provide the DVD OpenSuse11.4 installer (DVD OpenSUSE 11.4 can you order here )
PC or laptop, I suggest a capacity of 1 GB of RAM for optimal system requirements. Here I installed OpenSUSE 11.4 with a size of 7.5 GB hard drive.
Step by step to install OpenSUSE 11.4:
Turn on the PC and then insert the DVD the OpenSUSE 11.4 into DVD Rom make sure the first boot in the BIOS is directed to a DVD Rom. Initial display when booting from DVD OpenSUSE 11.4 as below:

Select Installation then press the ENTER key on the keyboard.

The system will read the DVD of OpenSUSE 11.4

Welcome screen
On top of the page you can set your language and keyboard layout. When the language is set, YaST will choose the applicable keyboard layout for you. However, if this is not correct, you can rectify this with the keyboard layout pull-down menu.Under the settings the end user license agreement (eula) is shown. To see the license agreement in other languages, click License Translation. If you accept the license, click Next.


Set the time
Here, you'll need to set your time zone which is displayed in the map of the world. You can select your time-zone by clicking on your country in the map or select it using the drop down menu's. You can choose to set your system time to UTC if you are not running a dual boot with windows. Windows does not use UTC time.Below the time zones the current set time is displayed. If this is not correct click Change. Now you can change the time manually.
if you have a working internet connection you can choose to select Synchronize with NTP server, to use a time server. You can choose a time server from the pull-down menu. Time will automatic be synchronized when clicking Accept.


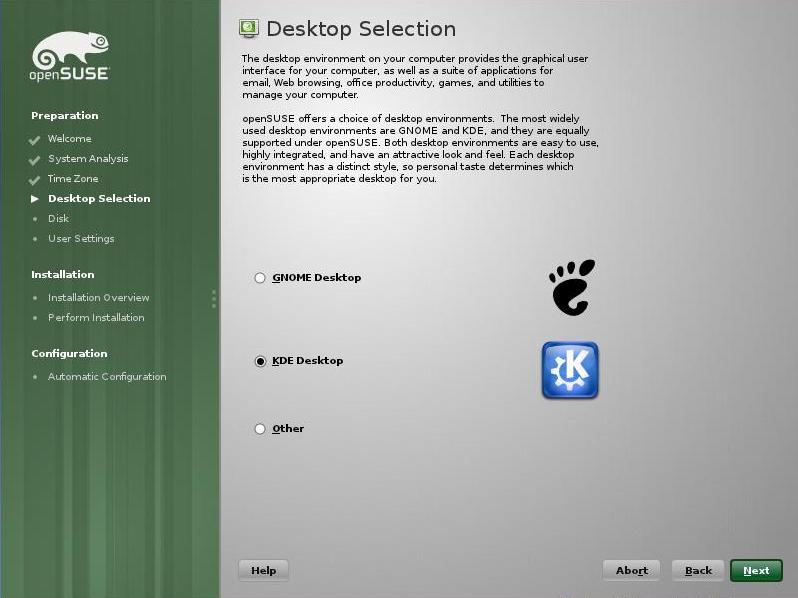
Select the dekstop wich will be used, in this installation i am using the KDE dekstop. Click the Next button to continue.
Setting up your Disk
A suggested partition schema for your harddisk is shown. If you have another operating system installed on the same hard disk (for example, Microsoft Windows or another Linux), YaST will resize that operating system so that it still on your computer, but has enough room to install openSUSE 11.4.
If you are not happy about the proposed configuration, you can click Create partition setup. If you use Edit partiton setup the partitioning program is loaded, showing you the proposed configuration, which you can edit manually.
If you have clicked Create partition setup you will see this screen. Here you can select for which hard disk a partition setup should be proposed. If you choose Custom partitioning the partitioning program is loaded, showing you the current configuration of your disk, which you can edit manually.
By default, the system will create the partition that has been suggested is was created partition / (read : root), swap and /home.


Create the Primary User
Enter your full name, an user name will be automatically chosen. If you wish you can change this user name to your liking. Specify a new password twice, for verification. By default, the system is set to use this password for the system administrator (also known as root). Also, automatic login is turned on by default. However, if you wish to have a more secure system and/or multiple users, uncheck this options.

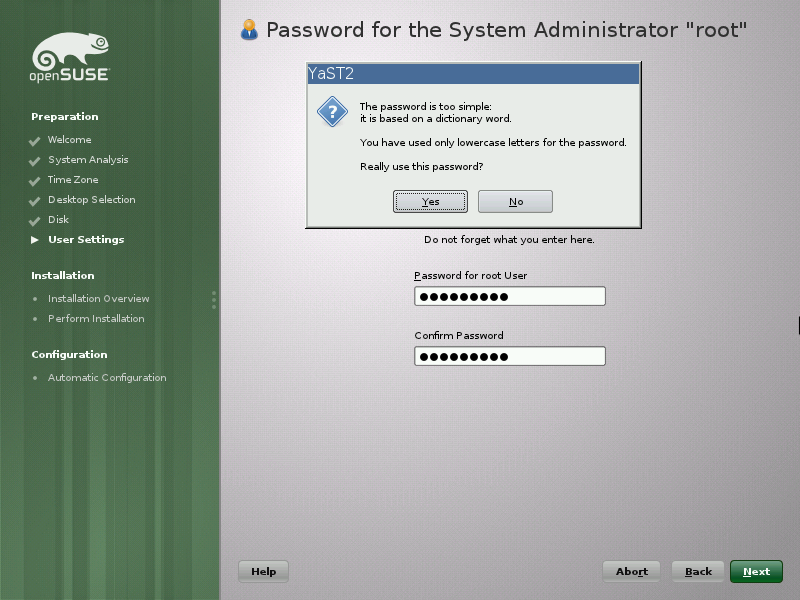
Set root password (Optional)
If you unchecked the Use this password for system administrator option in the previous screen, you have to provide a password for the user Root here.
In this example a simple password was used, for which YaST warns you.
Installation Overview
This is a summary of what YaST is planning on doing to your system. Read over the list and if you would like to change an option, click the title of the section. You can consult the help text in YaST for explanation of each item.
Booting
OpenSUSE uses GRUB to boot your system. A boot loader, like GRUB, is loaded by your system's bios, after which it loads the Linux kernel, sends specific options to the kernel and loads an initial ram-disk. This is necessary, since a bios is never capable to do this directly. GRUB also provides a chain loading option, to load another boot loader, like Windows.
If you have a very large disk and your first (windows) partition is larger then 125GB, your bios most probably will not find the boot loader when booting. In this case you can click Enable on the Boot from MBR is disabled. This puts your boot loader at the beginning of your disk.

Software
his is an overview of all the software that is going to be installed. If you want to install extra software, you can click the the section title. You can of course choose to install additional software after your system has been installed. Either way, please read YaST Software Management.
Locale Setting
You can choose to change your language and keyboard layout settings here. If you change your language here, additional language packs will be installed and your desktop environment will be in the language as well.

Firewall and SSH
A firewall is used to prevent unauthorized access from the network (and internet) to your computer. It is strongly recommended to keep this option enabled.
SSH can be used to securely log in to your computer. This is typically a terminal login and does not include a desktop login. Unless you really know what you are doing, keep this option disabled. You can set various ways to remotely access your computer after the installation.
Start Installation
If you agree with this overview, click install. You will be prompted to confirm if you really want to proceed. Click Install again to confirm.

Installation
YaST is now installing your new openSUSE system. Initially you will
be shown a slideshow about some nice features of openSUSE 11.4. If you
click Details you will see the steps performed in the installation. Under the tab Release notes you can read the release notes.Once finished, you'll be directed to restart the computer. Restart the computer, and remove the openSUSE install disc.

Finishing the Installation
On the first boot YaST will automatically configure your system's hardware and network settings.

Completion of Installation
openSUSE 11.4 is now installed! Once you login, you'll be greeted by the
openSUSE Greeter with all sorts of information about openSUSE on it.
Updates should have been configured automatically, and probably the
first update messages will appear, if you are connected to the internet.
You might want to check configuration to get yourself started!
