Rabu, 22 Februari 2012

Make Connections to VirtualBox

Okay, in this tutorial I will create a setting, how to keep the existing system operation in Operation virtualbox can be connected to the main system we use, here I am using OpenSuse 12.1 KDE as the primary system. which is already installed Windows XP SP2 in the virtualboxnya!

Simply, in the virtualbox manager, before running Xp, go to "File" used for setting up virtualbox Ip Address, then there we select the "Preferences", click once on the day we'll be taken to look like the following screenshot:
And in the "Network" in the first one empty, so we add the first hostnya, you can click Icon to plus (+) to add. After the add host-only network, we edit the first by clicking on the Icon or a screwdriver if you want to change the Ip virtual setting.
On the tab "Adapter" in the "IPv4 Address" it's up to you, I am here to change the corresponding IP "192.168.5.23" then click OK!

Then we to the following settings for the Operation System.
 There we are going to set the tab "Network", in the "Attached to" there select "Host-only adapter".
  After that in the "Name" will be loaded automatically "vboxnet0". If we check again in the Terminal with the command "ifconfig" then there has been formed from the IP host-only adapter.
Now click "OK" and we just run Windows Xp. After logging into Windows we need to set its virtual Xp Ip Address.

To set its Ip Address click "Start" then to "Control Panel", there select "Internet and Network Connections". After double click on "Local Area Connection" then we select "Properties" at the "Internet Protocol".
Section "Use The Following IP Address" I fill like the following screenshot:
So the virtual Xp Ip Address: 192.168.5.24, whereas Virtualboxnya Ip Address: 192.168.5.23 and in the "Subnet mask" I fill in there just like before Ip Address Virtualbox, which is 192.168.5.23! Click "OK"!

If done correctly then the virtual XP Ip address will change.
Up here I managed to set its Ip Address "vboxnet" and the virtual XP, so I can do a "ping" from OpenSuse to Windows XP without connecting to the Internet and vice versa, from Windows XP to OpenSuse. So I can learn many things, conduct experimentation, data sharing and others!

Be aware though, that the Windows firewall Xp here should be in the non-active state in order to do a "ping" from OpenSuse, so I had to disable firewallnya!

Ping (Windows Xp to OpenSuse):
ping (OpenSuse to Windows XP):

reference : Geeky's Blog!

differences the instance and the database

Most of us probably do not know the exact differences the instance and the database. Many think that the database is the instance. For a more critical then to wonder, if so what is the use of Oracle database instance and use the term?

If we create a database with DBCA, by default instance name and database name that does the same. Is the name of the current database we maintain that the same as the instance name?
  • To check the name of the instance, Oracle DBA must have all already know. Value of the ORACLE_SID is the name of the instance as well.
  • To check the database name, use the command select VALUE from v$parameter where NAME = 'db_name' 
More specifically, it helps us see the Oracle Database Architecture here


The instance is the processes structure and memory that run the database system (DBMS, database management system). While the database is a collection of files that store the data (which consists of datafile, controlfile, and redo log files).

Oracle Database terms that we often use it to refer to the database management system (DBMS) Oracle. said database management system may be too long. DBMS might say well why not. So easy-going, let's call it database.
reference : rohmad.net 

oracle database architecture

oracle database architecture


Database word in the phrase "the Oracle database architecture" should be a Database Management System (DBMS). For simplicity mention, Database Management System database is often simply called it.

Generally Oracle DBMS components consist of memory, processes, and files. Furthermore, these components are grouped as follows:

1. Instance 
Memory is referred to as the System Global Area (SGA), consisting of: Shared Pool  (Libary Cache Cache and Data Dictionary), Database Buffer Cache, Redolog Buffer Cache, Java Pool, Large Pool.
- Back ground process: PMON, SMON, DBWR, LGWR, CKPT, etc.

2. Database 
- Datafile
- ControlFile
- Redo Log File 

3. Other component 
- Process : Server process, user process.
- Memory : Program Global Area (PGA) .
- File : Archived log, parameter and file password.


reference : rohmad.net


Selasa, 14 Februari 2012

Installation Google Chrome in OpenSuse

Download and install Google Chrome

Google Chrome is a free web browser that takes just minutes to install. It's available for Windows, Mac, and Linux computers (see detailed system requirements). In this article, we'll walk you through each step of the installation process. 
Although Google Chrome can be copied to a local user directory and run without adminstrative privileges, we recommend that proper installation and updates be performed using a full installation via the native package management system. In order to do this, you should have administrative access during installation.  

1. Download Google Chrome in here

2. Review the Terms of Service and click the Agree and download button to continue. 

3. Click OK to open the package.

4. Click Install Package.

5. Once the installer file has been downloaded, a "Welcome to Google Chrome" dialog appears and prompts you to choose the search engine you'd like to use by default in the browser. 

6. In the dialog that appears, select from the following options, then click Start Google Chrome

To open the browser, go to Applications > Internet > Google Chrome. Google Chrome will add its repository to your package manager so that it can be kept up-to-date. 

Sending SMS from Gmail

Sending SMS with gmail 

In order to use this feature you have to enable the SMS (text messaging) in Chat lab. 

you can send SMS messages to your contact mobile phone using Gmail. To do so from gmail :

1. Enter your contact name in the 'Search or Invite Box', and select Send SMS from the box of options that appears to the right of your contact's name. Or, if you are already have a chat window open for this contact, just clik option and select Send SMS

2. In the dialog box, enter a phone number in the ‘Send SMS messages to this number’ field. This feature is only launched in selected countries. Click here for the list of supported countries and operators. If you are not located in one of these countries you can still use it, but you won't see the SMS option in Chat until you enable it manually in the Chat settings page.

3. Click Save

4. A Chat window appears. Just type your message as you would normally. When you hit Enter, the message will be sent to the phone number you entered.

If your contact replies, the text message response will appear as a reply in Chat. These conversations are stored in your Chat history just like regular chats (but keep in mind that you can’t go off the record while communicating via SMS).

SMS charges : Google does not charge for useing this service. However, mobile provider's standard charges will aplly to any SMS messages sent from a mobile device to Google Chat. Please check your mobile provider's price plan for details.

Note regarding mobile phone subscribers in North America: depending on which mobile plans your contacts in North America have, they may be charged by their movile providers for receibing text messages.

Note regarding phone subscribers of Pelephone in Israel: your contact on the Pelphone network will  receive your SMS messages for free, and will be charged for replying according to Pelephone's pricelist for core service. Special rates and packages do not apply

Note regarding mobile phone subscribers in Zambia : your contacts in Zambia will receive SMS messages for freee, and will be charged for replying according to their operator's price for sending an international SMS to the USA

Senin, 13 Februari 2012

How to Download and Install Oracle VM VirtualBox Extension Pack in Windows Host – VirtualBox 4.1.8


How to Download and Install Oracle VM VirtualBox Extension Pack in Windows Host – VirtualBox 4.1.8 

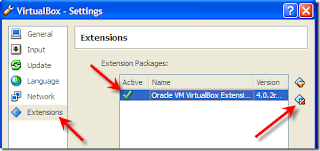
Recently when I opened a saved Windows xp virtual machine in VirtualBox 4.1.8 after the update, it showed a message about ‘ Oracle VM VirtualBox Extension Pack’ for better USB2.0 support. Its because of updated 4.1.8 version and features. The warning message did not give proper  information of downloading and installing  this package. This small guide shows how to download and install Oracle VM VirtualBox Extension Pack in Windows host machine.  Here is the message,

Recently when I opened a saved Windows 7 virtual machine in VirtualBox 4.0.2 after the update, it showed a message about ‘ Oracle VM VirtualBox Extension Pack’ for better USB2.0 support. Its because of updated 4.0.2 version and features. The warning message did not give proper  information of downloading and installing  this package. This small guide shows how to download and install Oracle VM VirtualBox Extension Pack in Windows host machine.  Here is the message,

 Its always better to have a guest operating system inside desktop virtualization software with USB 2.0 support for faster data transfer.

 Download  Link : http://dlc.sun.com.edgesuite.net/virtualbox/4.1.8/Oracle_VM_VirtualBox_Extension_Pack-4.1.8-75467.vbox-extpack

Installation can be done in Two ways.

 1. You can execute the downloaded file directly from Windows explorer. It will open the VirtualBox program and ask the question as below.


Press Install to start the installation.

2. The other way is, go to File –> Preferences in menu bar and select Extensions option in VirtualBox console.


Press Add Extension button as shown in above screen and browse the downloaded VM VirtualBox Extension Pack. That’s it.
You can view the installed extension packages in same place.
Uninstall a virtualbox extension package can be done here by selecting the pack and click remove button.


This installation will fix the warning message of USB 2.0 support in Oracle VirtualBox 4.1.8.
Let me know if this is useful.

Sabtu, 11 Februari 2012

Installation Opera In Linux

Installation Opera In Linux

Download Opera Browser for advance linux. you can download opera web browser from here
suppose that already exist, usually still shaped of tar, and we have to do extra in advance, so that it becomes a folder. in here i used opera 11. use the following command : 
mzherri@linux-tpft:~> tar -xvjf nama_file.tar.bz2
or 
mzherri@linux-tpft:~> tar -xjf nama_file.tar.bz2
then go into folder opera and type : 
mzherri@linux-tpft:~/opera-11.61-1250.i386.linux> ./install
follow the picture below 


now you can use opera web browser 
good luck
:-D


Installation VirtualBox in OpenSuse 12.1

Installation VirtualBox in OpenSuse 12.1

1. Install required library and package : kernel-source, make, gcc, gcc-c++, pam-devel, kernel-syms by using YAST | Software | Software Management or  Zypper package manager :

zypper in kernel-source make gcc gcc-c++ pam-devel kernel-syms

2. Download VirtualBox binary installer. Choose an appropriate version whether 32 bit or 64 bit depending your processor.

3. Install VirtualBox using Zypper with the following command  :

zypper in ./VirtualBox-3.2-3.2.6_63112_openSUSE111-1.x 

4. Add your user as VirtualBox group member by using YAST | Security & User | User & Group Management. Choose user name, click Edit and then move to Details tab and give a mark on vboxusers checkbox, cdrom and disk.

5. Logout re-login so new group will be updated to your profile

6. Run  VirtualBox from system menu or by using konsole/terminal  : VirtualBox (case sensitive)

Note 

1. Installation process may failed while compiling VirtualBox module for kernel. Check the version of your running kernel and kernel source using uname -r and zypper if kernel-source as below :  

mzherri@linux-tpft:~> zypper if kernel-source
Loading repository data...
Reading installed packages...
Information for package kernel-source:
Repository: Updates for openSUSE 12.1 12.1-1.4
Name: kernel-source
Version: 3.1.9-1.4.1
Arch: noarch
Vendor: openSUSE
Installed: Yes
Status: up-to-date
Installed Size: 371.5 MiB
Summary: The Linux Kernel Sources
Description:
Linux kernel sources with many fixes and improvements.
Source Timestamp: 2012-01-27 09:55:10 +0100
GIT Revision: efb5ff410eab35d86ab48d359d3edf177b1d82d5
GIT Branch: openSUSE-12.1


mzherri@linux-tpft:~> uname -r
3.1.0-1.2-desktop


See that I’m using same version for both running kernel and kernel-source. If you found different version, try to updating the lower version to be same version as another one.

2. VirtualBox will automatically remove old package if found previous installation without deleting your existing image but it’s highly recommended to create a backup before installing and updating VirtualBox.

references : vavai.net

Installation Multimedia Codecs in OpenSuse 12.1

Installation Multimedia Codecs in OpenSuse 12.1

OpenSuse, like Fedora. do not support the format non-free / proprietary in the community version.

1. Install Codec dengan 1-Click install (the easy way)

If you want to listen to the song format. Mp3 or watch the video format. Avi you need to install restricted formats, in OpenSUSE is very easy, only with 1-click it and leave it to the OpenSUSE, of course internet connection is required.

you only need to click the link below and follow the installation to complete

http://opensuse-community.org/codecs-kde.ymp 

Note, if you get a warning dialog like this do not panic! Simply select the top option, to allow the vendor to change some of the packages for openSUSE Packman, and then click OK - Try Again.


 2. Multimedia Codecs Installation via Terminal

This method is practically difficult, because the installation process using a terminal or command line. but for users who are accustomed to and are familiar with the terminal, would not have found it difficult.

The following packages will be installed:
libxine1-codecs
k3b-codecs
ffmpeg
lame
gstreamer-0_10-plugins-bad
gstreamer-0_10-plugins-ugly
gstreamer-0_10-ffmpeg
libdvdcss2 (miss if it does not need to play DVDs)

Follow the steps were as follows:
a. ketikan perintah di bawah ini pada terminal, dengan asumsi bahwa anda sudah berada pada mode root: 
linux-tpft:/home/mzherri # zypper addrepo -f http://ftp.gwdg.de/pub/linux/packman/suse/11.4/ packman
 
linux-tpft:/home/mzherri # zypper addrepo -f http://opensuse-guide.org/repo/11.4/ dvd


b.
Install codec
 linux-tpft:/home/mzherri # zypper install libxine1-codecs k3b-codecs ffmpeg lame gstreamer-0_10-plugins-bad gstreamer-0_10-plugins-ugly gstreamer-0_10-ffmpeg libdvdcss2


Selasa, 07 Februari 2012

Database Connection With Java

 Database Connection With Java

guys, the following script in java to connect to the Database; please try:

Here's how:

copy the following script

package blog;
import java.sql.*;
/**
 *
 * @author mzherri
 */
public class database {

    public static void main(String args[]){

        String url = "jdbc:mysql://localhost:3306/test";

        // url address match with the name of your Database
        // jdbc:mysql://localhost:3306/name of your database
        String user = "root";
       // user name of your database
       String pass = "root";
      // password of your database

        try{
            Class.forName("com.mysql.jdbc.Driver");

            // connection with your MySQL
            Connection con = DriverManager.getConnection(url, user, pass);

           // connection with your database
            System.out.println("Connection was succesfull");

           // connection succes
        }catch(ClassNotFoundException ex){
            System.out.println("Driver not found "+ex);

           // dirver not found in your project
        }catch(SQLException ex){
            System.out.println("Connection failed "+ex);

           // connection to your database failed
        }


    }

}


please add library for your project : 


and choose MySQL JDBC DRIVER, next clik add library


Try to "run" another source code or you can type SHIFT+F6. Should now connect and appears the information
"run:
Connection was succesfull
BUILD SUCCESSFUL (total time: 1 second)"

Kamis, 02 Februari 2012

Installation XAMPP in Linux

Installation XAMPP in Linux

By the way: In the past this software was called LAMPP but to avoid misconceptions we renamed it to » XAMPP for Linux «. So if you are seeking for LAMPP you're on the right track. ;)

If you encounter any problems with XAMPP please feel free to get in touch with us. This will help us to improve XAMPP and make it more useful for everybody.

Installation in 4 steps


1. Donwload xampp for linux, you can download in here

2. Installation 

After downloading simply type in the following commands:

         1. Go to a Linux shell and login as the system administrator root:

                type su 

         2. Extract the downloaded archive file to /opt:

             tar xvfz xampp-linux-1.7.7.tar.gz -C /opt

That's all. XAMPP is now installed below the /opt/lampp directory.

3. Start

To start XAMPP simply call this command:

/opt/lampp/lampp start

You should now see something like this on your screen:

Starting XAMPP 1.7.7...
LAMPP: Starting Apache...
LAMPP: Starting MySQL...
LAMPP started.
 

Ready. Apache and MySQL are running.

4. Test

OK, that was easy but how can you check that everything really works? Just type in the following URL at your favourite web browser:

http://localhost


Now you should see the start page of XAMPP containing some links to check the status of the installed software and some small programming examples.


STOPPING XAMPP

To stop XAMPP simply call this command:

/opt/lampp/lampp stop

You should now see:

Stopping LAMPP 1.7.7...
LAMPP: Stopping Apache...
LAMPP: Stopping MySQL...
LAMPP stopped.


And XAMPP for Linux is stopped.

UNINSTALL XAMPP 

 To uninstall XAMPP just type in this command:

rm -rf /opt/lampp


The end.

Rabu, 01 Februari 2012

Installation Netbeans in Linux

Installation Netbeans in Linux

Netbeans is the IDE (Integrated Development Environment) for Java programming language. In addition to Eclipse and Sun Java Creator, NetBeans IDE Java is one of the popular and commonly used.  Here i used OpenSuse Linux. Follow these guidelines to install Netbeans in Linux:

1. Installing Java SE. If not, please install Java SE first. Follow the guidelines of the article "Installation Java on OpenSUSE".

2. Download Netbeans from http://www.netbeans.info/downloads/index.php. Because it uses Linux, select the installation file for Linux. Select which no bundle with JEE, unless you really want it.

3Through the Konsole, go to download folder (for example in / opt, adapt it to your download folder).

4. Make sure the binary file is an executable file

#chmod + x netbeans.sh (change netbeans.sh with the name of the downloaded file, for example: netbeans-6.9.1-ml-linux, sign # means I use a root prompt)


5. do the the installation

# Sh netbeans.sh (sh filename spaces)


6. The installation process is running, follow wizardnya. Netbeans will perform the installation process by first detecting the location of the JDK as is done in stage 1. If JDK is not detected after they were installed (JDK installed in specific folder), use the option JavaHome as follows:

# ./netbeans.sh -is:javahome lokasiJDK 

7.  Run Netbeans. Once installed, Netbeans can be run from the Start Menu desktop use,  both in KDE and  GnomeIf there is no shortcutat the end of the installation there is usually a noticelocations where netbeans executable and how to run it.

After the installation process, we can start using Netbeans for Java projects we are. For users of Visual programming languages ​​(VB, Delphi, PowerBuilder, etc.), will Netbeans IDE feels very familiar because of the model and its shape is not too much different. For users of PHP or C, with a somewhat similar model code, programming Java with Netbeans might just need some adjustment time.

Installation Java On OpenSuse

 
Installation Java On OpenSuse

Java is programming language popular in the Linux enviroment. Capability and Flexibility to run on vorius operation system to make Java can be attractive option. Here is installation procedure on OpenSuse. Download java from here

Take for Linux. Do not take that in bundle with Netbeans or other. Currently (Febuary 2012) the latest version is JDK 7u2. For Linux there are two types (Linux RPM in self-extracting files and Linux in self-extracting file), take the second, with the name jdk-7u2-linux-i586.rpm

Copy to folder /opt

Go to Console / Terminal

Install Java SE
In console, type the following command [signs # do not participate in the type. It is the root user prompt. When logged in as normal user, sysmbol is $. To enter the prompt root from a normal user type su and enter the password].


# chmod +x /opt/jdk-7u2-linux-i586.rpm

# rpm -ivh /opt/jdk-7u2-linux-i586.rpm


Check the installation


# java -version

java version “1.6.0_22″
OpenJDK Runtime Environment (IcedTea6 1.10.4) (suse-0.3.2-i386)
OpenJDK Server VM (build 20.0-b11, mixed mode)

What if we install is version 1.6.0 but the version that comes out is another version? Means that existing Java SDK embedded in OpenSUSE. Java we have just installed is located in the folder. Try to check with the following command.

#ls -l /usr/bin/java

lrwxrwxrwx 1 root root 22 Nov 23 21:44 /usr/bin/java -> /etc/alternatives/java

if the result is as above or folder does not match. we can be "forced" to OpenSuse using Java that we just installed. Type the following command:
#ln -s /opt/jdk1.6.0/bin/java /usr/bin/java

Check back with the java-version command
Make a Classpath so that the Java compiler [javac] can be known from  various folderswith the following steps:

-Create a file named. Bash_profile. Save the home directory. If you are signed in as root, save it in / root. If the entry as a normal user, store them in / home / username. On Linux, the file that begins with a dot means hidden files.

-Type the contents of the file. Bash_profile with:

#JAVA_HOME=/opt/jdk1.6.0 

#export JAVA_HOME  

#export PATH=$PATH:$JAVA_HOME/bin

- Save

- Log-off from OpenSUSE  

- re-enter

- Test Compiler. Open console, type


#javac


If it produces output, it means that the Java compiler is ready to use. If not, re-writing of CLASSPATH check and adjust the installation conditions.