Learn to create a simple login system with php + mysql script, this tutorial easy to follow, teach you step by step.
Overview
In this tutorial create 4 files
1. form_login.php
2. checklogin.php
3. login_success.php
4. logout.php
Step
1. Create table "members" in database "login".
2. Create file form_login.php.
3. Create file checklogin.php.
4. Create file login_success.php.
5. Create file logout.php
1. First time create new database with name login and create table table member
CREATE TABLE `members` (
`id` int(4) NOT NULL auto_increment,
`username` varchar(50) NOT NULL default '',
`password` varchar(50) NOT NULL default '',
PRIMARY KEY (`id`)
)
insert data to table members
INSERT INTO `members` VALUES (1, 'herri', '1234');
2. Create form_login.php, use the following code
<html>
<head><title>Login Page</title>
</head>
<body>
<table width="300" border="0" align="center" cellpadding="0" cellspacing="1" bgcolor="#CCCCCC">
<tr>
<form name="form1" method="post" action="checklogin.php">
<td>
<table width="100%" border="0" cellpadding="3" cellspacing="1" bgcolor="#FFFFFF">
<tr>
<td colspan="3"><strong>Member Login </strong></td>
</tr><tr>
<td width="78">Username</td>
<td width="6">:</td>
<td width="294"><input name="myusername" type="text" id="myusername"></td>
</tr><tr>
<td>Password</td>
<td>:</td>
<td><input name="mypassword" type="text" id="mypassword"></td>
</tr><tr>
<td colspan="3"><input type="submit" name="Submit" value="Login"></td>
</tr>
</table>
</td>
</form>
</tr>
</table>
</body>
</html>
view in browser :
3. Create file checklogin.php, use the following code :
<?php
$host="localhost"; // Host name
$username="root"; // Mysql username
$password=""; // Mysql password
$db_name="LoginPage"; // Database name
$tbl_name="members"; // Table name
// Connect to server and select databse.
mysql_connect("$host", "$username", "$password")or die("cannot connect");
mysql_select_db("$db_name")or die("cannot select DB");
// username and password sent from form
$myusername=$_POST['myusername'];
$mypassword=$_POST['mypassword'];
// To protect MySQL injection (more detail about MySQL injection)
$myusername = stripslashes($myusername);
$mypassword = stripslashes($mypassword);
$myusername = mysql_real_escape_string($myusername);
$mypassword = mysql_real_escape_string($mypassword);
$sql="SELECT * FROM $tbl_name WHERE username='$myusername' and password='$mypassword'";
$result=mysql_query($sql);
// Mysql_num_row is counting table row
$count=mysql_num_rows($result);
// If result matched $myusername and $mypassword, table row must be 1 row
if($count==1){
// Register $myusername, $mypassword and redirect to file "login_success.php"
session_register("myusername");
session_register("mypassword");
header("location:login_success.php");
}
else {
echo "Wrong Username or Password";
}
?>
4. Create file login_success.php, use the following code :
<?
// Check if session is not registered , redirect back to main page.
// Put this code in first line of web page.
session_start();
if(isset($_session['myusername'])){
header("location:form_login.php");
}
?>
<html>
<body>
Login Successful<br>
<a href="logout.php">Logout</a>
</body>
</html>
view the browser :
5. Create file logout.php, use the following code :
<?
//If you want to logout, create this file
// Put this code in first line of web page.
session_start();
session_destroy();
header("location:form_login.php");
?>
Download Tutorial :
Good Luck :-)
Tampilkan postingan dengan label PHP. Tampilkan semua postingan
Kamis, 03 Mei 2012
Senin, 23 April 2012
Storing and display Image in Database
Storing Images to Database tutorial will explain how to save images
to the database and how to display images that have been stored in a
database
There are two ways to save images to the database:
- Save images to the database with the BLOB data type,
- Save images into a folder and record the location and image information to the database.
Storing Image Into Database With Blob Data Type
There are several things that need to be done before it can save the images into a database table field of type BLOB.
Preparing the Database and Table
Create a database with a name example “gallery”. Then create a table
in it with the name of “pictures” with structures like the one below:
| Name | Type data | Information |
| id | integer | primary key, auto increment |
| file_name | varchar(100) | |
| mime_type | varchar(50) | |
| file_data | Longblog |
Or use the following SQL query:
create database gallery;
use gallery;
CREATE TABLE `pictures` (
`id` int NOT NULL AUTO_INCREMENT,
`file_name` varchar(100) NOT NULL,
`mime_type` varchar(50) NOT NULL,
`file_data` mediumblob DEFAULT NULL,
PRIMARY KEY (`id`)
);
Create Upload Form
Create a html form to upload pictures, use the script below:
<!-- file form.html-->
<form name="form1" id="form1" method="post" action="upload.php" enctype="multipart/form-data">
Gambar: <input type="file" name="gambar" id="gambar" />
<input type="submit" name="Submit" id="Submit" value="Upload" />
</form>
Save the file with name form.html.
Storing Images to Database
The next step is to save images to the database, php script used below to save the image to the database.
<?php $connection = mysql_connect("dbhost", "dbuser", "dbpassword"); //customize to your database mysql_select_db("gallery");
if($_FILES['gambar']['size'] > 0 && $_FILES['gambar']['error'] == 0){
$fileName = $_FILES['gambar']['name']; $mimeType = $_FILES['gambar']['type'];
$tmpFile = fopen($_FILES['gambar']['tmp_name'], 'rb');
// (fileName, mode)
$fileData = fread($tmpFile, filesize($_FILES['gambar']['tmp_name']));
$fileData = addslashes($fileData);
$query = "insert into pictures set file_name='$fileName',mime_type='$mimeType', file_data='$fileData'";
mysql_query($query) or die("Upload Gambar Gagal: ".mysql_error());
echo "Gambar telah disimpan";
}
?>
save the file with name upload.php
Displaying Images From Database
The final step is to display images that have been stored in a database. To display the image takes 2 files. Gambar.php file to render the image and the file gallery.php gallery to display the entire image stored in the database. Use the following script:
File picture.php
<?php $connection = mysql_connect("dbhost", "dbuser", "dbpassword");
//customize to your database
mysql_select_db("gallery");
$idFile = $_GET['id'];
$dataGambar = mysql_fetch_array(mysql_query("select * from pictures where id='$idFile'"));
$filename = $dataGambar['file_name'];
$mime_type = $dataGambar['mime_type'];
$filedata = $dataGambar['file_data'];
header("content-disposition: inline;
filename=$filename");
header("content-type: $mime_type");
header("content-length: ".strlen($filedata));
echo ($filedata);
?> File gallery.php
<?php $connection = mysql_connect("dbhost", "dbuser", "dbpassword"); //customize to your database
mysql_select_db(“gallery”);
$query = “select * from pictures”;
$result = mysql_query($query);
$i=1;
echo ‘<table>’;
echo ‘<tr>’;
while($gambar = mysql_fetch_array($result)){
echo ‘<td><img src=”gambar.php?id=’.$gambar['id'].’” width=”150″ /></td>’;
if($i % 4 == 0){
echo ‘</tr><tr>’;
}
$i++;
}
echo ‘</tr>’;
echo ‘</table>’;
?>
Download Tutorial
Good Luck :-)
Sabtu, 31 Maret 2012
Delete Data In MySql With Php
continue the tutorial yesterday, Update Data in MySql With PHP. now we will try to edit data in MySql with php. The database and the table same as with yesterday.
<html>
<head>
<title>View Data</title>
</head>
<body>
<p align="center"><b>View Data</b></p>
<table align="center" cellpadding="0" cellspacing="25" border="0">
<tr>
<td>No</td>
<td>Name</td>
<td>Email</td>
<td>Comment</td>
<td colspan="2">Delete Data</td>
</tr>
<?php
//create connection to the database
$conn=mysql_connect("localhost", "root", "root");
mysql_select_db("db_contact_us");
//create query select
$sql="select * from tb_contact_us";
//reading data
$hasil=mysql_query($sql);
//display data
$no=1;
while($row=mysql_fetch_array($hasil)){
echo "<tr>";
echo "<td>".$no."</td>";
//display field name
echo "<td>".$row['Name']."</td>";
//display field email
echo "<td>".$row['Email']."</td>";
//Display field Comment
echo "<td>".$row['Comment']."</td>";
//Display Operation Update
echo "<td><a href='delete_data.php?no=".$row['number']."'>Delete</a></td>";
echo "</tr>";
$no++;
}
?>
</table>
</body>
</html>
Create Vew Data
Make a new HTML document with your text editor and create the HTML form as follows:
<html>
<head>
<title>View Data</title>
</head>
<body>
<p align="center"><b>View Data</b></p>
<table align="center" cellpadding="0" cellspacing="25" border="0">
<tr>
<td>No</td>
<td>Name</td>
<td>Email</td>
<td>Comment</td>
<td colspan="2">Delete Data</td>
</tr>
<?php
//create connection to the database
$conn=mysql_connect("localhost", "root", "root");
mysql_select_db("db_contact_us");
//create query select
$sql="select * from tb_contact_us";
//reading data
$hasil=mysql_query($sql);
//display data
$no=1;
while($row=mysql_fetch_array($hasil)){
echo "<tr>";
echo "<td>".$no."</td>";
//display field name
echo "<td>".$row['Name']."</td>";
//display field email
echo "<td>".$row['Email']."</td>";
//Display field Comment
echo "<td>".$row['Comment']."</td>";
//Display Operation Update
echo "<td><a href='delete_data.php?no=".$row['number']."'>Delete</a></td>";
echo "</tr>";
$no++;
}
?>
</table>
</body>
</html>
Save the HTML document with the name of the directory view_data.html and put it on your web server. Then see the results on your web browser. If you have done it correctly then it will be as follows:
Create Delete Data
<html>
<head>
<title>Delete Data</title>
</head>
<body>
<?php
//connect to the database
$conn=mysql_connect("localhost", "root", "");
mysql_select_db("db_contact_us");
//create a variable for which data is transmitted
$no = $_GET["no"];
//create query to storing data
$sql="DELETE FROM tb_contact_us WHERE number = '$no'";
//saving to the database
mysql_query($sql);
echo "<h2>Data has been Delete</h2>";
?>
<a href="view_data.php">view the data</a>
</body>
</html>
<head>
<title>Delete Data</title>
</head>
<body>
<?php
//connect to the database
$conn=mysql_connect("localhost", "root", "");
mysql_select_db("db_contact_us");
//create a variable for which data is transmitted
$no = $_GET["no"];
//create query to storing data
$sql="DELETE FROM tb_contact_us WHERE number = '$no'";
//saving to the database
mysql_query($sql);
echo "<h2>Data has been Delete</h2>";
?>
<a href="view_data.php">view the data</a>
</body>
</html>
Save the HTML document with the name of the directory delete_data.phpand put it on your web server. Then see the results on your web browser. If you have done it correctly then it will be as follows:
if you clik view the data then you will be as follows :
Good Luck :-)
Jumat, 23 Maret 2012
Update Data in MySql With PHP
continue the tutorial yesterday, Saving Data to the Database and Displaying Data with PHP. now we will try to edit data in MySql with php. The database and the table same as with yesterday.
create a view the data
Make a new HTML document with your text editor and create the HTML form as follows:
<html>
<head>
<title>View Data</title>
</head>
<body>
<p align="center"><b>View Data</b></p>
<table align="center" cellpadding="0" cellspacing="25" border="0">
<tr>
<td>No</td>
<td>Name</td>
<td>Email</td>
<td>Comment</td>
<td colspan="2">Update Data</td>
</tr>
<?php
//create connection to the database
$conn=mysql_connect("localhost", "root", "root");
mysql_select_db("db_contact_us");
//create query select
$sql="select * from tb_contact_us";
//reading data
$hasil=mysql_query($sql);
//display data
$no=1;
while($row=mysql_fetch_array($hasil)){
echo "<tr>";
echo "<td>".$no."</td>";
//display field name
echo "<td>".$row['Name']."</td>";
//display field email
echo "<td>".$row['Email']."</td>";
//Display field Comment
echo "<td>".$row['Comment']."</td>";
//Display Operation Update
echo "<td><a href='form_update.php?no=".$row['number']."'>Update</a></td>";
echo "</tr>";
$no++;
}
?>
</table>
</body>
</html>
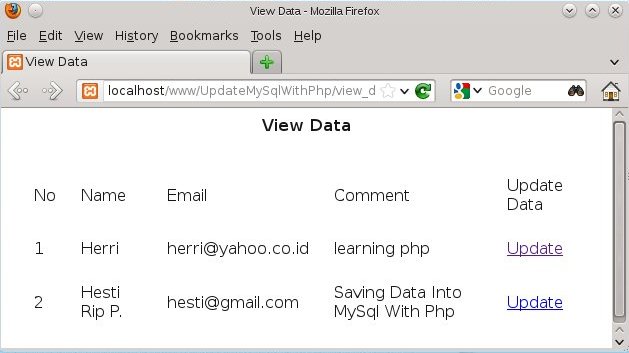
Save the HTML document with the name of the directory view_data.html and put it on your web server. Then see the results on your web browser. If you have done it correctly then it will be as follows:
Create form to update the data
Make a new HTML document with your text editor and create the HTML form as follows:
<html>
<head>
<title>Update Data</title>
</head>
<body>
<?
$no = $_GET["no"];
//create connection to the database
$conn=mysql_connect("localhost", "root", "root");
mysql_select_db("db_contact_us");
//create query select
$sql="select * from tb_contact_us where number = '".$no."'";
//reading data
$hasil=mysql_query($sql);
//display data
if($row=mysql_fetch_array($hasil)){
?>
<form id="form1" name="form1" method="post" action="save_update.php">
<p>Name :
<input name="name" type="text" id="name" value="<?=$row['Name']; ?>"/>
</p>
<p>
Email :
<input name="email" type="text" id="email" value="<?=$row['Email']; ?>" />
</p>
<p>Comment :
<textarea name="comment" id="comment"><?=$row['Comment']; ?></textarea>
</p>
<p>
<input type="submit" name="Submit" value="Update" />
</p>
</form>
<?
}
?>
</body>
</html>
Save the HTML document with the name of the directory view_data.html and put it on your web server. Then see the results on your web browser. If you have done it correctly then it will be as follows:
Create save to update the data
Make a new HTML document with your text editor and create the HTML form as follows:
<html>
<head>
<title>Update Data</title>
</head>
<body>
<?php
//connect to the database
$conn=mysql_connect("localhost", "root", "root");
mysql_select_db("db_contact_us");
//create a variable for which data is transmitted
$no = $_POST["no"];
$name = $_POST["name"];
$email = $_POST["email"];
$comment = $_POST["comment"];
//create query to storing data
$sql="UPDATE tb_contact_us SET Name = '$name', Email = '$email', Comment = '$comment' where number = '$no'";
//saving to the database
mysql_query($sql);
echo "<h2>Data has been Changed</h2>";
?>
<a href="view_data.php">view the data</a>
</body>
</html>
Save the HTML document with the name of the directory save_update.html and put it on your web server. Then see the results on your web browser. If you have done it correctly then it will be as follows:
if you clik view the data then it be as follows :
create a view the data
Make a new HTML document with your text editor and create the HTML form as follows:
<html>
<head>
<title>View Data</title>
</head>
<body>
<p align="center"><b>View Data</b></p>
<table align="center" cellpadding="0" cellspacing="25" border="0">
<tr>
<td>No</td>
<td>Name</td>
<td>Email</td>
<td>Comment</td>
<td colspan="2">Update Data</td>
</tr>
<?php
//create connection to the database
$conn=mysql_connect("localhost", "root", "root");
mysql_select_db("db_contact_us");
//create query select
$sql="select * from tb_contact_us";
//reading data
$hasil=mysql_query($sql);
//display data
$no=1;
while($row=mysql_fetch_array($hasil)){
echo "<tr>";
echo "<td>".$no."</td>";
//display field name
echo "<td>".$row['Name']."</td>";
//display field email
echo "<td>".$row['Email']."</td>";
//Display field Comment
echo "<td>".$row['Comment']."</td>";
//Display Operation Update
echo "<td><a href='form_update.php?no=".$row['number']."'>Update</a></td>";
echo "</tr>";
$no++;
}
?>
</table>
</body>
</html>
Save the HTML document with the name of the directory view_data.html and put it on your web server. Then see the results on your web browser. If you have done it correctly then it will be as follows:
Create form to update the data
Make a new HTML document with your text editor and create the HTML form as follows:
<html>
<head>
<title>Update Data</title>
</head>
<body>
<?
$no = $_GET["no"];
//create connection to the database
$conn=mysql_connect("localhost", "root", "root");
mysql_select_db("db_contact_us");
//create query select
$sql="select * from tb_contact_us where number = '".$no."'";
//reading data
$hasil=mysql_query($sql);
//display data
if($row=mysql_fetch_array($hasil)){
?>
<form id="form1" name="form1" method="post" action="save_update.php">
<p>Name :
<input name="name" type="text" id="name" value="<?=$row['Name']; ?>"/>
</p>
<p>
Email :
<input name="email" type="text" id="email" value="<?=$row['Email']; ?>" />
</p>
<p>Comment :
<textarea name="comment" id="comment"><?=$row['Comment']; ?></textarea>
</p>
<p>
<input type="submit" name="Submit" value="Update" />
</p>
</form>
<?
}
?>
</body>
</html>
Save the HTML document with the name of the directory view_data.html and put it on your web server. Then see the results on your web browser. If you have done it correctly then it will be as follows:
and i will try change name, email and comment it will be as follows :
Create save to update the data
Make a new HTML document with your text editor and create the HTML form as follows:
<html>
<head>
<title>Update Data</title>
</head>
<body>
<?php
//connect to the database
$conn=mysql_connect("localhost", "root", "root");
mysql_select_db("db_contact_us");
//create a variable for which data is transmitted
$no = $_POST["no"];
$name = $_POST["name"];
$email = $_POST["email"];
$comment = $_POST["comment"];
//create query to storing data
$sql="UPDATE tb_contact_us SET Name = '$name', Email = '$email', Comment = '$comment' where number = '$no'";
//saving to the database
mysql_query($sql);
echo "<h2>Data has been Changed</h2>";
?>
<a href="view_data.php">view the data</a>
</body>
</html>
Save the HTML document with the name of the directory save_update.html and put it on your web server. Then see the results on your web browser. If you have done it correctly then it will be as follows:
if you clik view the data then it be as follows :
Good Luck :-)
Download Tutorial
Download Tutorial
Kamis, 15 Maret 2012
Saving Data to the Database and Displaying Data with PHP
In the tutorial Saving Data to Database & Data with PHP to showing this will be discussed how to build a connection to a MySQL database, saving data to a database, read data from database and display the data to the user. This tutorial requires basic knowledge of MySQL you. If you did not already have a basic knowledge of MySQL please visit the website to learn MySQL www.MySQL.com first. Because in this tutorial will not be discussed in depth about MySQL.
Saving Data to Database
Create a database with the name db_contact_us, then create a table named tb_contact_us, with the following structure:
Create a Contact Form
Make a new HTML document with your text editor and create the HTML form as follows:
<html>
<head>
<title>Contact US</title>
</head>
<body>
<form id="form1" name="form1" method="post" action="save_contact.php">
<p>Name :
<input name="name" type="text" id="name" />
</p>
<p>
Email :
<input name="email" type="text" id="email" />
</p>
<p>Comment :
<textarea name="comment" id="comment"></textarea>
</p>
<p>
<input type="submit" name="Submit" value="comment" />
</p>
</form>
</body>
</html>
Save the HTML document with the name of the directory contact_form.html and put it on your web server.
Make PHP Script
<html>
<head>
<title>Contact Us</title>
</head>
<body>
<?php
//connect to the database
$conn=mysql_connect("localhost", "root", "root");
mysql_select_db("db_contact_us");
//create a variable for which data is transmitted
$name=$_REQUEST['name'];
$email=$_REQUEST['email'];
$comment=$_REQUEST['comment'];
//create query to storing data
$sql="INSERT INTO tb_contact_us (name, email, comment) values ('$name','$email','$comment')";
//saving to the database
mysql_query($sql);
echo "<h2>Data has been saved</h2>";
?>
</body>
</html>
Now save with the name of the directory save_contact.php and put it on your web server. Then see the results on your web browser. If you have done it correctly then it will be as follows:
| Field | Tipe Data |
| Name | Varchar(50) |
| Varchar(50) | |
| Comment | Text |
Create a Contact Form
Make a new HTML document with your text editor and create the HTML form as follows:
<html>
<head>
<title>Contact US</title>
</head>
<body>
<form id="form1" name="form1" method="post" action="save_contact.php">
<p>Name :
<input name="name" type="text" id="name" />
</p>
<p>
Email :
<input name="email" type="text" id="email" />
</p>
<p>Comment :
<textarea name="comment" id="comment"></textarea>
</p>
<p>
<input type="submit" name="Submit" value="comment" />
</p>
</form>
</body>
</html>
Save the HTML document with the name of the directory contact_form.html and put it on your web server.
Make PHP Script
<html>
<head>
<title>Contact Us</title>
</head>
<body>
<?php
//connect to the database
$conn=mysql_connect("localhost", "root", "root");
mysql_select_db("db_contact_us");
//create a variable for which data is transmitted
$name=$_REQUEST['name'];
$email=$_REQUEST['email'];
$comment=$_REQUEST['comment'];
//create query to storing data
$sql="INSERT INTO tb_contact_us (name, email, comment) values ('$name','$email','$comment')";
//saving to the database
mysql_query($sql);
echo "<h2>Data has been saved</h2>";
?>
</body>
</html>
Now save with the name of the directory save_contact.php and put it on your web server. Then see the results on your web browser. If you have done it correctly then it will be as follows:
Displaying data
After you can save data to the database now you will learning how to read data from database and display it to the user. To read data from a database you must first connect to the database, and then read the data using the function mysql_query () and mysql_fetch_array (). To more clearly do the following example.
Create a new document with your text editor, and begin to make the initial HTML document.
<html>
<head>
<title>Display Data</title>
</head>
<body>
<?php
//create connection to the database
$conn=mysql_connect("localhost", "root", "root");
mysql_select_db("db_contact_us");
//create query select
$sql="select * from tb_contact_us";
//reading data
$hasil=mysql_query($sql);
//display data
while($row=mysql_fetch_array($hasil)){
//display field name
echo "Name : ".$row['Name'];
//display field email
echo "<br>Email : ".$row['Email'];
//Display field Comment
echo "<br>Comment : ".$row['Comment'];
echo "<hr>";
}
?>
</body>
</html>
<head>
<title>Display Data</title>
</head>
<body>
<?php
//create connection to the database
$conn=mysql_connect("localhost", "root", "root");
mysql_select_db("db_contact_us");
//create query select
$sql="select * from tb_contact_us";
//reading data
$hasil=mysql_query($sql);
//display data
while($row=mysql_fetch_array($hasil)){
//display field name
echo "Name : ".$row['Name'];
//display field email
echo "<br>Email : ".$row['Email'];
//Display field Comment
echo "<br>Comment : ".$row['Comment'];
echo "<hr>";
}
?>
</body>
</html>
Now save with the name of the directory read_data.php and put it on your web server. Then see the results on your web browser. If you have done it correctly then it will be as follows
Good Luck Guys :-)
Minggu, 11 Maret 2012
Creating Form Insert Data
php mysql basic step by step tutorial In order to make this input data is 'user friendly', you can make a HTML form for input data, example:
The result:
This HTML form will send two variable, $name and $address variable, into input.php file as describe in the ACTION parameter of FORM HTML.
After you have already made input.php, fill the input data and then click the sent button such as:
For the result:
As for the exercises, put some of datas into employees database.
01 | <!DOCTYPE HTML PUBLIC "-//W3C//DTD HTML 4.01 |
02 | Transitional//EN" |
03 | "http://www.w3.org/TR/html4/loose.dtd"> |
04 | <html> |
05 |
06 | <head> |
07 | <title>Form Input Data</title> |
08 | </head> |
09 |
10 | <body> |
11 | <table border="1"> |
12 | <tr> |
13 | <td align="center">Form Input Employees Data</td> |
14 | </tr> |
15 | <tr> |
16 | <td> |
17 | <table> |
18 | <form method="post" action="input.php"> |
19 | <tr> |
20 | <td>Name</td> |
21 | <td><input type="text" name="name" size="20"> |
22 | </td> |
23 | </tr> |
24 | <tr> |
25 | <td>Address</td> |
26 | <td><input type="text" name="address" size="40"> |
27 | </td> |
28 | </tr> |
29 | <tr> |
30 | <td></td> |
31 | <td align="right"><input type="submit" |
32 | name="submit" value="Sent"></td> |
33 | </tr> |
34 | </table> |
35 | </td> |
36 | </tr> |
37 | </table> |
38 | </body> |
39 | </html> |
The result:
This HTML form will send two variable, $name and $address variable, into input.php file as describe in the ACTION parameter of FORM HTML.
01 | <? |
02 | //the example of inserting data with variable from HTML form |
03 | //input.php |
04 | mysql_connect("localhost","root","admin");//database connection |
05 | mysql_select_db("employees"); |
06 |
07 | //inserting data order |
08 | $order = "INSERT INTO data_employees |
09 | (name, address) |
10 | VALUES |
11 | ('$name', |
12 | '$address')"; |
13 |
14 | //declare in the order variable |
15 | $result = mysql_query($order); //order executes |
16 | if($result){ |
17 | echo("<br>Input data is succeed"); |
18 | } else{ |
19 | echo("<br>Input data is fail"); |
20 | } |
21 | ?> |
After you have already made input.php, fill the input data and then click the sent button such as:
For the result:
As for the exercises, put some of datas into employees database.
Langganan:
Postingan (Atom)